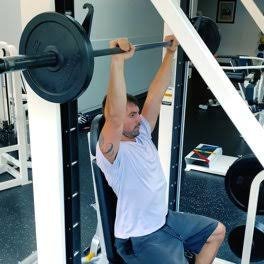
Overhead pressing has long been the gold standard for building dense, powerful deltoids. However, when the primary objective shifts from general athletic power to pure target-muscle hypertrophy, the traditional free-weight barbell press presents clear physical limitations. Balancing a heavy barbell directly over your center of gravity demands immense core stabilization, rotator cuff co-contraction, and constant neural focus just to keep the bar path vertical.
Enter the seated Smith machine shoulder press. By locking the barbell onto a smooth, fixed 2D vertical or slightly angled track, the Smith machine eliminates the balance dynamic entirely. This visual and physical stability allows you to direct nearly 100% of your neural drive into pushing the anterior and lateral heads of your deltoids to complete muscular failure safely—without a spotter and without the risk of the bar dropping forward or backward.
Section 1: Anatomic Foundations & Smith Machine Biomechanics
Understanding how the fixed bar trajectory of a Smith machine interacts with shoulder anatomy is essential for positioning your bench correctly and maximizing target fiber tension.
      Â
1. Anterior Deltoid Focus
The front head of your deltoid originates along the lateral third of your clavicle and inserts into the deltoid tuberosity of the humerus. Its primary function is shoulder flexion and horizontal adduction. The Smith machine allows you to lock in a deep, highly loaded stretch at collarbone height without the bar drifting forward away from your center of mass.
2. Reduced Rotator Cuff Co-Contraction
In a free-weight barbell overhead press, your four rotator cuff muscles (supraspinatus, infraspinatus, teres minor, subscapularis) must fire intensely to keep the head of your humerus centered in the shallow glenoid cavity. In a Smith machine press, the external steel guide rods provide that structural stability. This reduction in joint stabilization demands frees up higher motor unit recruitment in the larger prime movers.
3. Scapular Mechanics and Scapular Plane Pressing
The human shoulder joint does not naturally operate best in a pure, flat coronal plane (elbows flared straight out to the sides at 90°). Pressing in the scapular plane (elbows angled roughly 30° to 45° forward) provides a cleaner angle for the humerus, drastically reducing the risk of subacromial impingement. When setting up your bench inside a Smith machine, adjusting your position relative to the bar enables you to mimic this natural scapular plane path cleanly.
Section 2: Angled Track vs. Vertical Track Smith Machines
Understanding the mechanical track of your gym’s Smith machine dictates how you orient your bench and body.
1. Straight Vertical Track
- Characteristics: The bar moves in an unyielding 90° line relative to the floor.
- Setup Strategy: Place your bench so the bar clears your nose and chin by roughly 1 to 2 inches on the descent, landing directly over your clavicles or upper sternum.
2. Angled Track (5° to 7° Slope)
- Characteristics: Designed to simulate the subtle natural arc of human pushing movements.
- Setup Strategy: Sit facing the direction where the bar moves upward and backward as you press. This trajectory closely mirrors natural shoulder flexion and keeps joint stress at a minimum throughout the extension.
Section 3: Comparative Analysis
| Movement Variation | Target Muscle Isolation | Joint Friendliness | Safety at True Failure | Stabilization Requirement | Load Potential |
| Seated Smith Machine Press | Maximum | High (With proper bench placement) | Maximum (Safety catches) | Lowest | Very High |
| Standing Barbell OHP | Low (Core-limited) | Moderate | Low | Highest | High |
| Seated Dumbbell Press | High | High | Moderate | High | Moderate |
| Plate-Loaded Lever Press | Superior | Highest | High | Low | High |
Key Takeaway: The seated Smith machine press combines the high load potential of a barbell with the localized tension and failure-safety of a fixed gym machine.
Section 4: Step-by-Step Execution Blueprint
Achieving peak target-muscle engagement on a Smith machine requires precise bench setup, wrist positioning, and tempo control.
Step 1: Bench Angle & Positioning
- Set an adjustable bench to an angle between 75° and 80° (just short of completely vertical). This slight incline provides back support while keeping primary force directed overhead through the deltoids.
- Wheel the bench into the center of the Smith machine cage.
- Position the bench so that when the bar descends, it passes within 1 to 2 inches of your nose and rests lightly across your upper chest/collarbone area.
Step 2: Safety Catch Height Adjustment
- Adjust the Smith machine’s mechanical safety catches to stop the bar just below your chin or level with your collarbones.
- Setting these catches ensures that if your deltoids reach complete muscular failure mid-rep, the bar lands harmlessly on the stops without trapping you underneath.
Step 3: Grip Width & Unrack
- Sit firmly back against the pad, feet planted flat on the floor for leverage.
- Grab the bar with a pronated grip slightly wider than shoulder-width. When the bar is at the bottom position, your forearms should form a 90° vertical angle relative to the bar.
- Rotate the bar off the hooks with a quick flick of your wrists, keeping your wrists stacked directly over your elbows.

Step 4: The Controlled Eccentric Phase
- Lower the bar under total control over a 2-to-3 second cadence.
- Tuck your elbows slightly forward (around 30° in front of the torso) rather than flaring them straight out to the sides.
- Allow the bar to descend until it reaches upper-chest or collarbone level, feeling a complete stretch across your front deltoids.
Step 5: The Concentric Overhead Drive
- Exhale and press the bar upward with control, pushing through the heels of your palms.
- Drive the bar to full overhead arm extension without aggressively locking or snapping your elbow joints at the top.
- Pause for half a second at the peak of contraction before initiating the next descent.
Error 1: Bench Set Too Far Forward
- The Problem: Sitting too far in front of the bar forces you to pull your head back excessively or press behind your head, placing extreme rotational stress on your shoulders.
- The Fix: Shift the bench backward so the bar path falls cleanly in front of your face, passing close to your nose and landing comfortably on your upper chest.
Error 2: Flaring Elbows Out Completely Wide (90°)
- The Problem: Pressing with your elbows flared wide in the coronal plane causes subacromial pinching and shifts tension away from the anterior deltoid toward the shoulder joint capsule.
- The Fix: Tuck your elbows forward slightly at a 30° to 45° angle throughout the descent and ascent.
Section 6: Advanced Hypertrophy & High-Intensity Techniques
Because the Smith machine offers integrated safety stops and a guided track, it is ideal for applying advanced muscle-building protocols past standard failure:
1.Smith Machine Rest-Pause Sets:3 Sets | 6-8 Reps + Rest-Pause | 90 sec Rest.
Pick a heavy weight you can press for 6–8 reps to failure. Re-rack the bar on the hooks, rest for 15 seconds while remaining seated, then unrack and push out 2–3 additional reps to absolute failure.
2.Lengthened Stretch Partials:2 Working Sets to Failure + Safety Partial Reps.
Set the safety stops at collarbone height. Press full reps until failure. Then, continue performing 3–5 short partial reps solely out of the bottom stretched position (from chest to chin height) before racking the bar.
3.Mechanical Bench Angle Drop Sets:3 Sets | 8-10 Reps + Reverse Angle Drop.
Start your set at an 80° high-incline position for 8 reps to failure. Re-rack, quickly drop the bench angle down one notch to 65° or 70°, and immediately continue pressing to extract extra reps with improved mechanical leverage.
Section 7: Warm-up & Joint Mobilization Protocol
- Band Overheads & Dislocations (15 reps): Hold a light resistance band with a wide grip and pass it smoothly over your head to warm up the shoulder girdle and chest.
- Scapular Wall Slides (12 reps): Slide your forearms up a wall while keeping your lower back and elbows in contact to fire up the serratus anterior and lower traps.
- Smith Machine Ramp-up Sets:
- Set 1: Empty Bar x 15 reps (focus on smooth path and bench positioning)
- Set 2: 50% Working Weight x 10 reps
- Set 3: 75% Working Weight x 4 reps
- Main Working Sets: 3-4 sets x 6-10 reps
Section 8: Frequently Asked Questions (FAQ)
1. Should I press behind the neck on a Smith machine?
No. Behind-the-neck pressing forces the shoulder joint into extreme external rotation and horizontal abduction, which can cause severe subacromial impingement and labral strain. Pressing in front of your head to upper-chest height is significantly safer and yields superior anterior deltoid tension.
2. Is the Smith machine overhead press inferior to dumbbell pressing?
Not for hypertrophy. Dumbbells require high stabilization and offer individual joint freedom, which is great for overall shoulder health and balance. However, the Smith machine allows you to push heavier loads to complete failure without worrying about dropping weights or losing control, making it equally or more effective for raw muscle growth.
3. How close to my face should the bar travel?
The bar should pass as close to your nose and chin as safely possible—roughly 1 to 2 inches. Keeping the bar path close to your face keeps the moment arm short and ensures force is directed straight down through your deltoids rather than creating leverage against your wrists and shoulders.
SEO REQUIREMENTS
Below are the complete, production-ready SEO strategy specifications and metadata for publishing this comprehensive guide.
Keyword Density & Placement Strategy
- Primary Keyword (“smith machine seated shoulder press”): Positioned naturally in the main title (H1), introductory text, subheadings (H2s), schema metadata, and final section. Target density: ~1.2% to 1.5%.
- Secondary Keywords: Integrated logically across comparative tables, execution steps, track angle breakdowns, and FAQ answers.
- Semantic Entities / LSI Terms: Anterior deltoid, scapular plane, subacromial impingement, mechanical safety catches, high-incline bench, pronated grip, eccentric control, rest-pause sets.
