
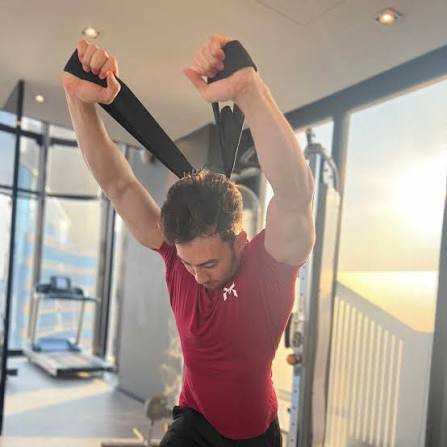

When lifters discuss building thick, horseshoe-shaped triceps, the conversation often revolves around heavy compound pressing, dips, and heavy dumbbell skull crushers. However, your triceps brachii account for approximately 60% of your upper arm’s total muscle volume, and the single largest component of that muscle group—the long head—cannot be fully developed through standard pressing or pushdown variations alone.
To maximize the growth of the triceps long head, you must load the muscle while your arm is positioned overhead in shoulder flexion. This is where the overhead band tricep extension becomes an essential tool in your training toolkit.
Whether you are building a home gym, working around joint irritation, or adding a metabolic finisher to a heavy gym session, elastic resistance provides unique mechanical advantages that traditional free weights cannot replicate.
Biomechanics & Functional Anatomy of the Overhead Extension
To understand why overhead extensions are required for complete arm development, you need to examine the functional anatomy of the triceps brachii.
The Three Heads of the Triceps
- The Lateral Head: Located on the outside of your upper arm, originating from the posterior surface of the humerus. It creates width when viewed from the front and forms the outer ridge of the horseshoe shape.
- The Medial Head: Positioned deep within the lower back of the upper arm, near the elbow joint. It acts as the primary stabilizer during elbow extension under light-to-moderate loads.
- The Long Head: The largest of the three heads, running along the back of the upper arm. Unlike the lateral and medial heads, the long head is a bi-articular muscle, meaning it crosses two distinct joints: the elbow joint and the shoulder joint (attaching directly to the infraglenoid tubercle of the scapula).
Active Insufficiency vs. Stretch-Mediated Hypertrophy
Because the long head crosses the shoulder joint, its muscle length changes based on your shoulder position:
- In Neutral or Extension (Pushdowns & Kickbacks): When your arms are held down at your sides, the long head enters a shortened state. Performing elbow extension in this position can lead to active insufficiency, where the muscle is too shortened to generate maximum force.
- In Shoulder Flexion (Overhead Extensions): Raising your arms overhead pulls the origin point (scapula) further away from the insertion point (ulna). This puts the long head into a stretched position under load.
Modern biomechanical research demonstrates that training muscles at longer muscle lengths (stretch-mediated hypertrophy) triggers greater muscle growth compared to training them exclusively in shortened positions.

The Physics of Linear Variable Resistance (LVR)
Traditional iron weights (dumbbells and barbells) supply a constant gravitational load. The resistance you feel depends on the moment arm created between the weight and the pivot joint.
Elastic bands operate on Linear Variable Resistance (LVR). As an elastic band stretches, the tension increases proportionally based on Hooke’s Law ($F = k \cdot x$).
Why LVR Benefits the Elbow Joint
During heavy free-weight overhead extensions, the moment arm—and therefore the stress on the olecranon tendon—is highest at the very bottom of the movement, where the elbow is bent at its acute angle. For lifters with tendon sensitivity, heavy iron loads at this deep angle can lead to joint irritation.
Elastic bands solve this problem:
- At the Bottom (Deep Flexion): The band is under minimal stretch, placing lower mechanical strain on the elbow joint and tendons when they are most vulnerable.
- At the Top (Full Lockout): As you extend your forearm toward the ceiling, the band reaches maximum extension, delivering peak mechanical tension right as the tricep reaches full contraction.
Step-by-Step Execution: Perfect Form Cues
Below are detailed setups for both the Foot-Anchored Standing Extension and the Low-Door Anchored Extension.
Method A: Foot-Anchored Standing Overhead Extension
1.Set Your Foundation:Footing & Base.
Stand upright with your feet hip-width apart. Place the middle of a continuous loop band flat under the arches of both feet. Step wide enough to create light baseline tension.
2.Position the Band Overhead:Clean & Press.
Grasp the top loop of the band with both hands using a neutral grip (palms facing each other). Press your hands straight overhead until your elbows are locked out. Engage your glutes and brace your core to maintain a neutral spine.
3.Lower Behind the Head:Eccentric Lowering.
Keep your upper arms positioned close to your ears with your elbows pointing forward. Inhale as you slowly lower your hands behind your head over a 3-second tempo, allowing your forearms to dip below a 90-degree angle.
4.Drive Upward:Concentric Lockout.
Exhale and drive your hands back toward the ceiling by extending your elbows. Keep your upper arms stationary—do not allow your elbows to flare outward or drift forward.
5.Hold Lockout:Peak Contraction.
At complete elbow lockout, pause for 1 to 2 full seconds to hold the triceps under peak elastic tension before initiating the next rep.
Method B: Low-Door Anchored Extension (Low-Back Friendly)
If stepping on the band creates unwanted pull on your lower back, anchor the band near floor level behind you.
- Setup: Attach a door anchor at the bottom of a door frame and loop your resistance band through it.
- Positioning: Stand facing away from the door. Grab the band, bring it over your shoulder level, and step forward to create baseline tension.
- Execution: Stagger your feet (one foot forward, one foot back) and lean slightly forward at a 15-degree angle. Press the band forward and upward at a 45-to-60-degree angle. This setup maintains constant tension on the long head while protecting your lower back.
Common Mistakes & How to Fix Them
To get the most out of every rep, make sure to avoid these technical errors:
- Elbow Flaring: Allowing your elbows to flare wide out to the sides shifts load away from the triceps and onto the shoulders. Fix: Keep your elbows tucked inward, facing forward or angled no wider than 45 degrees.
- Lumbar Hyperextension (Arching the Lower Back): Arching your spine to press heavier band tension overhead strains the lumbar spine. Fix: Squeeze your glutes, brace your abs as if preparing for a push, or adopt a staggered stance.
- Using Momentum: Jerking your torso forward to initiate the press takes tension off the triceps. Fix: Lower the resistance or use a slower, controlled 3-second eccentric tempo.
Advanced Programming & Hypertrophy Protocols
Because elastic bands allow you to adjust load rapidly by changing your foot placement or grip height, they work exceptionally well for high-intensity training methods.
1. The Constant-Tension Drop Set
Perform a set to near-failure using a wide foot stance (high band tension). Immediately step your feet closer together to reduce band tension and continue for another 5–8 reps until complete muscular fatigue.
2. Pre-Exhaustion Supersets
Combine a direct long-head isolation movement with a compound pressing movement:
- Low-Anchor Band Overhead Extension: 15 reps (Focus on a 2-second hold at lockout)
- Close-Grip Band Push-Ups: Immediately transition to push-ups until failure.
Summary Routine Table
| Exercise | Primary Target | Rep Range | Rest Interval | Key Cues |
| Foot-Anchored Overhead Ext. | Triceps Long Head | 12–15 Reps | 60 Seconds | Keep elbows pointing forward; 1s hold at lockout |
| Low-Anchor Overhead Ext. | Long & Lateral Heads | 15–20 Reps | 45 Seconds | Staggered stance; slight forward torso lean |
| Single-Arm Overhead Ext. | Unilateral Long Head | 15 Reps/side | 30 Seconds | Fixes side-to-side strength imbalances |
#Fitness #TricepsWorkout #ResistanceBands #TricepExtension #ArmDay #HomeWorkout #GymTips #StrengthTraining #Hypertrophy #MuscleBuilding #FitnessGoals #WorkoutRoutine #Bodybuilding #ExerciseForm #TricepsExercise #FitLife #UpperBodyWorkout #BandWorkout #GymMotivation #ArmWorkout #FitnessJourney #TricepDay #FitTips #TrainingTips #PhysicalFitness #SportScience #PushDay #WorkoutMotivation #HomeGym #PersonalTrainer
