
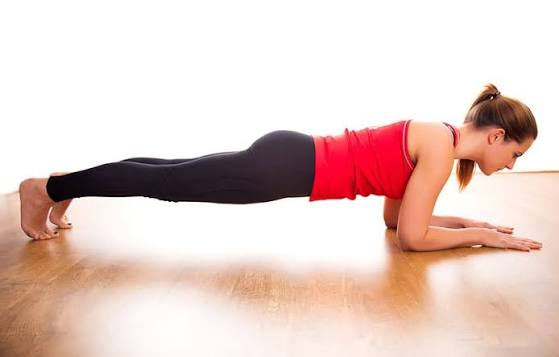

In modern exercise science, physical therapy, and high-performance athletic conditioning, few isometric movements carry the structural importance of the plank.
While dynamic abdominal exercises like traditional crunches, sit-ups, and Roman-chair trunk flexions rely on repeated spinal bending—which subjects intervertebral discs to high compressive and shear loads—the plank works directly alongside human spinal architecture. It trains your midsection to perform its most vital functional responsibility: anti-extension, or resisting gravitational pull to keep your spine safe, neutral, and locked under pressure.
1. Deep Biomechanics: Kinetic Chain Integration
The plank is often mistakenly labeled a simple “abs exercise.” Biomechanically, it functions as a total-body isometric co-contraction that recruits muscles across your entire kinetic chain, from your cervical flexors down to your toes.
Kinetic Tension Pathway
- Cervical Neutrality: Deep Neck Flexors (Longus Colli) keep the neck extended straight relative to the upper torso.
- Scapulothoracic Anchor: Serratus Anterior & Rhomboids protract the shoulder girdle to form a rigid upper frame.
- Anterior Core Hydraulic Brace: Intra-Abdominal Pressure (IAP) generation via Transverse Abdominis, Rectus Abdominis, Internal & External Obliques.
- Pelvic-Hip Lockout: Posterior Pelvic Tilt (PPT) driven by the Gluteus Maximus.
- Distal Lever Integration: Quadriceps keep the legs rigid, while the Plantar Flexors anchor to the floor.
Muscle Architecture & Functional Roles
- Transverse Abdominis (TVA): The deepest layer of your abdominal wall. Acting like an internal weight belt, its horizontal fibers contract to draw the abdominal wall inward, compressing your abdominal cavity. This elevates Intra-Abdominal Pressure (IAP), creating a rigid hydraulic cylinder that supports your lower back against compressive loads.
- Rectus Abdominis: Functions as the primary dynamic anti-extensor. It keeps your ribcage tied down toward your pelvis, preventing your lower back from arching toward the floor.
- Internal & External Obliques: Running diagonally across your sides, these muscle sheets form a lattice over your torso. They resist lateral sagging, prevent pelvic twisting, and maintain lateral stability.
- Gluteus Maximus: Squeezing your glutes rotates your pelvis into a subtle posterior pelvic tilt (PPT). This tucks your tailbone slightly under, relieving tension on tight hip flexors (iliopsoas) and putting your rectus abdominis in an optimal mechanical leverage position to generate force.
- Serratus Anterior: Pressing firmly into the floor through your forearms engages the serratus anterior, holding your shoulder blades flat against your ribcage to prevent scapular winging.
- Quadriceps & Latissimus Dorsi: Extending your knees locks out your lower legs, while active lat engagement pulls your upper arms downward, linking your upper back straight to your core.

2. Flawless Execution Protocol: Step-by-Step
Executing a plank correctly requires focus on every point of contact. Quality always trumps passive duration—a strict 30-to-60-second high-tension hold builds far more functional strength and stability than a multi-minute sagging hold.1.1. Establish Your Upper Body Base:Elbow & Shoulder Placement.
Lower yourself to an exercise mat and place your forearms flat on the floor with your elbows positioned directly beneath your shoulders at a 90-degree angle. Keep your forearms parallel to each other with your palms flat or hands loosely clasped.2.2. Set Your Upper Back and Scapulae:Scapular Protraction.
Press firmly away from the floor through your forearms to slightly protract your shoulder blades. This engages your serratus anterior, creating a stable upper back base and preventing your chest from sinking between your shoulders.3.3. Lock In the Pelvis and Legs:Posterior Pelvic Tilt.
Step your feet back one at a time with your toes tucked and knees fully extended. Squeeze your glutes tightly to pull your tailbone under into a posterior pelvic tilt. This pre-tensions your abdominal wall before your full body weight is suspended.4.4. Drive Active Co-Contraction:Total-Body Isometric Tension.
Keep your neck neutral by looking at the floor roughly 6 inches ahead of your hands. Intentionally pull your elbows toward your toes and drag your toes toward your elbows without moving them. This creates intense total-body tension that maximizes core recruitment.
3. Pathomechanical Diagnostics: Correcting Core Flaws
Holding a plank with improper form shifts gravitational loads away from your muscles and directly into passive joints, ligaments, and lumbar intervertebral discs.
1. Anterior Pelvic Tilt (Sagging Hips)
- Primary Failure Point: Lumbar Spine (L4–L5 / L5–S1)
- Musculoskeletal Risk: Causes severe shear stress on intervertebral discs, facet joint compression, and lower back strain.
2. Hip Elevation (Piking into an Inverted “V”)
- Primary Failure Point: Core / Abdominal Wall
- Musculoskeletal Risk: Completely bypasses the core wall by converting the movement into a low-intensity, bone-stacked shoulder hold.
3. Scapular Collapse (Chest Sinking Between Shoulders)
- Primary Failure Point: Thoracic Spine & Scapulae
- Musculoskeletal Risk: Leads to scapular winging, upper trapezius strain, and potential impingement within the subacromial space.
4. Cervical Hyperextension (Looking Forward or at the Clock)
- Primary Failure Point: Cervical Spine (C1–C7)
- Musculoskeletal Risk: Results in cervical spine compression, upper-capitis muscle strain, and breaks kinetic alignment across the posterior chain.
4. High-Tension vs. Ultra-Endurance Planking
Planking serves two entirely different neurological purposes depending on how it is executed:
A. The RKC (Russian Kettlebell Challenge) High-Tension Plank
Designed for maximum core strength, explosive power, and abdominal hypertrophy. The goal is Maximum Voluntary Contraction (MVC) rather than holding for extended time:
- Set up in a standard forearm plank position.
- Clasp your hands into tight fists.
- Actively drag your elbows down toward your toes while pulling your toes up toward your elbows (without moving them).
- Squeeze your quads, glutes, and abdomen with 100% maximum effort.
Key Takeaway: While a passive plank can often be held for 2 to 3 minutes, a true RKC plank produces intense muscle shaking and full neuromuscular fatigue in just 10 to 20 seconds.
B. Ultra-Endurance Planking (Postural Endurance)
While standard strength programs emphasize short, high-tension holds, ultra-endurance athletes focus on low-threshold Type-I slow-twitch muscle fiber efficiency.
- Male World Record: The official Guinness World Record for the longest continuous forearm plank stands at an incredible 9 hours, 38 minutes, and 47 seconds (set by Josef Šálek from Czechia).
Guinness World Records
Female World Record: The women’s world record stands at an impressive 4 hours, 30 minutes, and 11 seconds (set by DonnaJean Wilde from Canada).
CBS News
5. Complete Progression Roadmap: From Beginner to Elite
Rather than simply adding time to a passive hold, progress the mechanical difficulty by adjusting leverage, moment arms, and dynamic stability:
- Level 1: Incline Forearm Plank (Rehab / Beginner)
Forearms rest on an elevated bench or box. Reduces the gravitational load, making it easier to master the posterior pelvic tilt without overloading weak lower back stabilizers.
- Level 2: Standard Knee Plank (Novice)
Executed on the mat with knees touching the floor. Shortens the kinetic lever while reinforcing proper upper back protraction and core engagement.
- Level 3: Strict Forearm Plank (Intermediate)
Full lever from forearms to toes. Maintains flawless alignment from ears through shoulders, hips, and ankles for 30 to 60 seconds.
- Level 4: Long-Lever Plank (Advanced)
Walk your elbows 4 to 6 inches forward past your shoulders. Moving the pivot point further from your center of mass increases the leverage against your abs, dramatically raising core demand.
- Level 5: Swiss Ball “Stir the Pot” (Elite)
Place your forearms on a stability ball and make small, controlled circular motions with your elbows while keeping your hips completely still. Introduces multi-planar instability to the static hold.
6. Periodized Core Programming Guidelines
Routine A: Pre-Workout Neural Primer (Before Heavy Lifts)
Use short, max-tension holds before heavy squats, deadlifts, or overhead presses to wake up deep local stabilizers and establish a tight bracing reflex.
- RKC High-Tension Plank: 3 sets x 15 seconds (100% max effort pull)
- Rest: 45 seconds between sets
Routine B: Complete Core Stability Circuit (Post-Workout Finisher)
Perform at the end of a strength training session to build core hypertrophy, stability, and total-body fatigue resistance.
- Standard Forearm Plank (or Long-Lever): 3 sets x 45–60 seconds
- Side Plank: 3 sets x 30 seconds per side
- Pallof Press (Cable or Resistance Band): 3 sets x 12 reps per side
- Rest: 60 seconds between rounds
#Plank #PlankWorkout #CoreStrength #AbsWorkout #SixPackAbs #FitnessGoals #GymMotivation #BodyweightTraining #CoreWorkout #FitLife #GymLife #WorkoutRoutine #StrengthTraining #Calisthenics #AbWorkout #TrainHard #FitnessMotivation #GymTips #ExerciseTips #PersonalTrainer #FunctionalFitness #HomeWorkout #FitnessJourney #GymRat #PhysicalFitness #AbdominalExercise #CoreConditioning #AntiExtension #FitFam #GymRoutine
