
When it comes to building an unbreakable core, carving out deep abdominal hypertrophy, and developing functional anti-extension strength, few training tools rival the simple ab roller (or ab wheel).
While traditional floor exercises like crunches and sit-ups primarily isolate the upper rectus abdominis through repetitive spinal flexion, the ab wheel rollout forces your entire anterior chain to resist dynamic extension under increasing leverage. Electromyography (EMG) studies consistently show that ab wheel rollout variations elicit significantly higher muscular activation in the upper and lower rectus abdominis, internal and external obliques, and lats than nearly any other conventional core movement.
1. Deep Biomechanics: The Physics and Anatomy of Anti-Extension
To understand why the ab wheel rollout is so demanding, you must examine the mechanical levers and force vectors acting on your spine as you roll forward.
The Mechanics of the Lengthening Moment Arm
During a rollout, your knees or feet act as the fixed pivot point, while the wheel serves as the moving contact point with the floor.
As you extend forward:
- Horizontal Leverage Increases: The horizontal distance between the wheel and your center of mass increases exponentially.
- Gravitational Torque Amplifies: Gravity exerts greater downward force on your lower back and pelvis, creating a huge extension torque that tries to collapse your lumbar spine into an arch.
- Anterior Chain Recruitment Multiplies: To counteract this extension torque, your abdominal wall must contract with extreme isometric force to maintain structural alignment.
Key Muscle Recruitment Breakdown
- Rectus Abdominis (The Six-Pack): Acts as the primary dynamic and isometric stabilizer holding your pelvis in line with your ribcage as the lever stretches overhead.
- Transverse Abdominis (TVA): The deep, internal core muscle that acts like an anatomical weight belt. It compresses the abdominal cavity, increases intra-abdominal pressure, and stabilizes the lumbar spine.
- Internal and External Obliques: Lock down lateral trunk stability and prevent rotational twisting or pelvic tilting throughout the full extension.
- Latissimus Dorsi and Pectoralis Major: Work dynamically to pull your extended upper arms back toward your torso during the concentric (return) phase.
- Serratus Anterior: Keeps your shoulder blades properly protracted and wrapped around your ribcage, preventing scapular winging.
- Gluteus Maximus: Keeps your pelvis tilted posteriorly at the start and throughout the movement, preventing hip sagging.
2. Active Extension Mechanics: The Master-Class Form Protocol
Executing the ab rollout safely and effectively requires strict attention to setup cues, breath control, and total-body tension.
Step 1: Set Up the Hollow-Body Foundation
Start on your knees on a thick pad or exercise mat, holding the ab roller directly beneath your shoulders with an overhand grip. Before moving an inch:
- Tuck your chin slightly to align your neck with your spine.
- Round your upper back slightly into a hollow-body dome.
- Squeeze your glutes hard to tuck your tailbone under into a posterior pelvic tilt.
Step 2: Initiate the Reach via the Shoulders
Begin the extension by reaching forward with your shoulders and arms, pushing the wheel away from your body.
- Do not drop your hips first.
- Keep your hips and shoulders moving forward at the exact same speed.
- Inhale deeply into your diaphragm as you extend outward.
Step 3: Hold the Bracing Position at Maximum Reach
Roll forward only as far as your core can maintain a neutral spine and hollow-body brace.
- At maximum extension, your chest should be close to the floor, with your arms extended overhead.
- Never let your belly or lower back dip toward the ground.
- If you feel your lower back arching, you have passed your active range of control and must shorten your extension distance.

Step 4: Drive the Concentric Return Through the Abs and Lats
To return to the starting position, exhale forcefully through your mouth and contract your anterior core:
- Pull the wheel back by pulling your ribs down toward your hip bones and flexing your lats.
- Do not sit back onto your heels or bend at your hips to pull yourself back—this disengages your abs and turns the movement into a passive hip flexor motion.
- Stop when the wheel returns directly beneath your shoulders.
3. Four Major Form Flaws and How to Fix Them
Flaw 1: The Sagging Lumbar Collapse
- The Error: Allowing your hips to drop toward the floor mid-rollout, causing your lower back to arch excessively.
- The Risk: Places high shear stress directly onto your L4-L5 lumbar vertebrae and facet joints.
- The Fix: Squeeze your glutes hard throughout the entire rep to keep your pelvis locked in a posterior tilt.
Flaw 2: The Hip-Flexor Pullback (Hips First)
- The Error: Bending at your hips and pushing your glutes backward toward your calves to initiate the return phase.
- The Risk: Completely removes tension from your rectus abdominis and over-taxes your hip flexors.
- The Fix: Imagine pulling the floor toward your knees using only your armpits and abs. Keep your hip angle relatively fixed until your arms return beneath your torso.
Flaw 3: Bending the Elbows
- The Error: Flexing your arms during the rollout, turning the exercise into a partial triceps pressdown.
- The Risk: Reduces the leverage on your core and wears out your arm muscles prematurely.
- The Fix: Lock your triceps out fully or keep a fixed 5-degree micro-bend in your elbows from start to finish.
Flaw 4: Over-Extending Beyond Strength Limits
- The Error: Rolling out as far as possible before your core strength can support the weight.
- The Risk: Results in structural failure at the bottom of the movement, leading to lumbar strain.
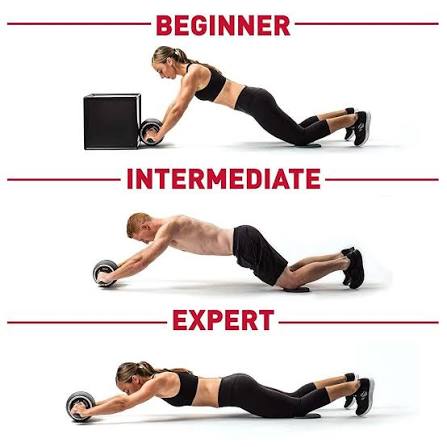
- The Fix: Train with a wall or block to artificially restrict your range of motion until your core adapts to the load.
4. The Complete 6-Stage Progression System
Do not jump straight into full kneeling or standing rollouts if your core strength is not ready. Work through these progressive stages, achieving 3 sets of 10-12 clean reps before advancing to the next level.
Level 1: Incline Ab Rollout
- Execution: Place the ab wheel on an elevated platform, bench, or incline ramp while kneeling on the floor.
- Why It Works: Decreases the angle of gravity relative to your body, reducing the lever force on your lower back while teaching you proper hollow-body positioning.
Level 2: Wall-Blocked Ab Rollout
- Execution: Kneel on a mat facing a wall, placing the wheel a measured distance away (e.g., 2 to 3 feet). Roll forward until the wheel touches the wall, pause briefly, then return.
- Why It Works: The wall acts as a hard stop, preventing you from rolling beyond your point of core control and keeping your spine protected.
Level 3: Strict Kneeling Ab Rollout
- Execution: Perform the rollout on your knees on a flat floor through a full range of motion, bringing your chest near the ground before pulling back.
- Why It Works: The gold standard for anterior core building, offering full range-of-motion abdominal tension and hypertrophy.
Level 4: Band-Assisted Standing Rollout
- Execution: Loop a heavy resistance band around an overhead pull-up bar and wrap the bottom loop around your hips or chest. Stand tall and perform a standing rollout.
- Why It Works: The band provides maximum assistance at the bottom position where leverage is hardest, helping you learn full standing mechanics safely.
Level 5: Eccentric-Only Standing Rollout
- Execution: Stand tall, roll forward controlled all the way down to the floor over a 3 to 5-second count, drop your knees gently to the mat at the bottom, and reset at the top.
- Why It Works: Overloads the eccentric phase of the standing variation, building extreme tendon and muscular adaptation.
Level 6: Strict Full Standing Ab Rollout
- Execution: Stand with your feet shoulder-width apart, bend forward to place the wheel on the floor, and roll out until your entire body is parallel to the ground before pulling all the way back up to a standing position.
- Why It Works: Represents the pinnacle of bodyweight core strength and total-body stability.
5. Comprehensive Periodized Workout Programs
Because the ab wheel rollout places heavy demands on your central nervous system, upper body stabilizers, and lower back, incorporate it early in your core routine when your muscles are fully fresh.
Program A: Core Foundation & Lumbar Protection (Beginner – 2 to 3x per week)
- Wall-Blocked Ab Rollout: 3 sets of 8–10 reps (2-second eccentric lowering phase)
- Plank Hold: 3 sets of 45 seconds
- Pallof Press: 3 sets of 12 reps per side
Program B: Core Hypertrophy & Anti-Extension Strength (Intermediate – 2x per week)
- Strict Kneeling Ab Rollout: 4 sets of 8–12 reps (1-second hold at full reach)
- Hanging Leg Raise: 3 sets of 10–12 reps
- Cable Woodchoppers: 3 sets of 12 reps per side
Program C: Elite Athletic Performance & Calisthenics (Advanced – 2x per week)
- Band-Assisted or Full Standing Ab Rollout: 4 sets of 3–6 reps
- Hanging Toes-to-Bar: 3 sets of 8–10 reps
- Dragon Flags or Hollow Body Rocks: 3 sets of 30–45 seconds
#AbRoller #AbWheel #CoreWorkout #SixPackAbs #FunctionalTraining #AbsOfSteel #AbWheelRollout #CoreStrength #FitnessMotivation #GymLife #BodyweightFitness #Calisthenics #StrengthTraining #GymRoutine #WorkoutTips #FitnessGoals #PersonalTraining #CoreTraining #HomeWorkout #ExerciseTips #FitFam #GymMotivation #AbWorkout #TrainHard #FitnessCommunity #PhysiqueGoals #AthleticPerformance #StrengthAndConditioning #AbsExercise #MuscleBuilding
