
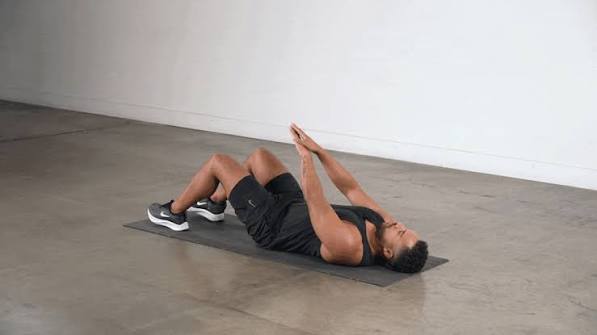

If you have been relying solely on standard floor crunches, traditional anchored sit-ups, or high-rep decline sit-ups to carve out a dense, defined core, you have likely hit an agonizing plateau. While traditional sit-ups engage the abdominal wall, they suffer from a major mechanical flaw: they heavily over-engage the hip flexors, place excessive compressive shear forces on the lumbar spine, and lose mechanical tension near the top of the movement.
Then the classic signs of poor core loading set in:
- You feel a deep, uncomfortable pull in your lower back or hip flexors rather than an intense burn in your upper and middle abs.
- Your neck aches after every abdominal session because you are instinctively pulling your head forward to cheat momentum.
- Your abdominal wall lacks that thick, dense, modular separation despite low body fat levels.
When these walls hit, the diagnosis is clear: you need an abdominal exercise that eliminates momentum, increases the internal lever arm, and forces the rectus abdominis to contract vertically against gravity.
Enter the reaching sit-up.
By simply extending your arms completely locked out straight toward the ceiling and driving vertically rather than flexing forward toward your knees, the reaching sit-up fundamentally alters the force vectors of core training. It turns a standard flexor movement into a high-tension, vertically driven core isolation exercise that neutralizes hip flexor dominance and protects the lumbar spine.
Part 1: Deep Core Anatomy & Biomechanics
To build a truly functional, visually striking midsection, you must stop viewing your abs as a single flat sheet of muscle. The abdominal wall is a multi-layered, multi-directional corset made up of four primary muscle groups, along with critical supporting muscles of the ribcage and spine.
1. Rectus Abdominis (The Six-Pack Wall)
The rectus abdominis is a long, paired muscle running vertically from the pubic crest up to the costal cartilages of ribs 5–7. It is separated down the middle by the linea alba and divided horizontally by tendinous intersections, which create the visual “six-pack” look.
- Function: Flexes the trunk/lumbar spine forward and tilts the pelvis posteriorly.
- Reaching Sit-Up Activation: Extending your arms vertically lengthens the resistance lever arm (the distance between the weight of your upper body/arms and the pivot point of your lumbar spine). This long lever forces the upper and middle segments of the rectus abdominis to fire with significantly higher torque output than a standard crunch where hands are tucked behind the head.
2. Transverse Abdominis (TVA – The Internal Weight Belt)
The TVA is the deepest layer of the abdominal wall, running horizontally around your midsection like a natural corset beneath the rectus abdominis and obliques.
- Function: Compresses abdominal contents, maintains intra-abdominal pressure (IAP), and stabilizes the lumbar spine during heavy structural movements like squats and deadlifts.
- Reaching Sit-Up Activation: To initiate a reaching sit-up without arching your lower back, you must actively hollow your abdomen and pull your navel inward toward your spine. This keeps the TVA under continuous isometric tension from start to finish.
3. Internal & External Obliques (Lateral Stabilizers)
The obliques lie on the sides of your waistline in a diagonal crisscross pattern.
- Function: Rotate the trunk, flex the spine laterally, and resist unwanted rotation (anti-rotation).
- Reaching Sit-Up Activation: Although reaching straight up is primarily a sagittal-plane exercise, the internal and external obliques contract bilaterally to prevent your torso from twisting or swaying as you drive your hands toward the ceiling.
4. Serratus Anterior & Anterior Deltoids (The Upper Anchors)
The serratus anterior consists of finger-like muscle strips running over the ribs on the side of your chest.
- Function: Protracts and rotates the scapula upward.
- Reaching Sit-Up Activation: Keeping your arms fully extended and reaching actively for the ceiling at the top of each rep forces the serratus anterior and front shoulders to hold an intense isometric contraction, building upper-ribcage definition.
Part 2: The Biomechanical Advantage of the Vertical Reach
Why does reaching straight up toward the ceiling feel so much harder than doing a traditional sit-up? The answer lies in basic mechanical vectors and lever arm mechanics.
TRADITIONAL SIT-UP (Horizontal Vector & Hip Flexor Dominated)Force Vector: Pulling forward toward knees[Upper Body] ===========> Pivots at Hips (Psoas pulls hard on Lumbar Spine) REACHING SIT-UP (Vertical Vector & Pure Abdominal Flexion)Force Vector: Reaching straight up to ceiling[Upper Body] ^ | (Pure Rectus Abdominis Flexion against long leverage) |
1. Lengthening the Resistance Moment Arm
In physics, torque equals force multiplied by the length of the lever arm ().
- When you fold your arms across your chest or place your hands behind your neck during a standard sit-up, the center of mass of your upper body remains close to the pivot point (your lumbar spine/hips).
- When you lock your arms straight overhead, you shift your upper body’s center of mass significantly further away from the pivot point. This artificially increases the moment arm without adding extra external weight plates, forcing your rectus abdominis to generate far greater muscular force to lift your upper back off the floor.
2. Neutralizing Hip Flexor Takeover (Psoas Major)
During a traditional floor sit-up, once your shoulders clear the first 30 degrees of flexion, your abdominal muscles reach peak short-range contraction. To complete the rest of the sit-up and bring your chest all the way to your knees, your psoas major and iliacus (hip flexors) take over the movement.
- If your feet are anchored under a bench or heavy dumbbell, your hip flexors pull forcefully on your lumbar vertebrae, pulling your lower back into hyper-lordosis (excessive arching) and taking tension away from your abs.
- The reaching sit-up completely fixes this. By aiming your hands straight up at the ceiling, your trajectory remains vertical rather than forward. The movement naturally caps out once your upper and middle back clear the floor—the exact point where the rectus abdominis reaches maximum contraction—without ever letting the hip flexors drag your torso forward.
Part 3: Step-by-Step Execution Mastery
To maximize core recruitment and protect your neck and lower back, your technique must be precise. Moving too fast or using body momentum defeats the purpose of this long-lever movement.
Here is the master execution protocol for the Standard Bodyweight Reaching Sit-Up.1.Establish Your Base:Setup & Spinal Alignment.
Lie flat on your back on a high-density exercise mat. Bend your knees to a 90-degree angle with your feet planted flat on the floor, shoulder-width apart. Press your lower back flat into the mat by performing a slight posterior pelvic tilt, eliminating any gap beneath your spine.2.Lock the Vertical Vector:Arm Extension & Eye Focus.
Extend both arms straight up toward the ceiling, locking your elbows completely. Position your hands directly above your chest. Fix your eyes on a single spot on the ceiling directly between your fingertips—do not look forward at your knees or down at your toes.3.Drive Vertically Through the Core:Concentric Reach.
Exhale forcefully as you contract your abs, peeling your head, neck, shoulder blades, and upper back off the mat. Drive your hands straight up toward the ceiling spot. Imagine trying to touch the ceiling with your knuckles rather than reaching toward your knees.4.Hold the Squeeze:Peak Contraction.
At the top position—when your upper back is completely elevated and your abs are locked in maximum contraction—pause for 1 to 2 full seconds. Squeeze your abdominal wall hard against the long lever load.5.Lower Segment by Segment:Controlled Eccentric.
Inhale deep into your diaphragm and slowly unroll your spine back down to the mat over a 3-second tempo. Lower yourself segment by segment (mid-back first, upper back second, shoulders last), keeping your arms pointing straight up toward the ceiling until your shoulder blades lightly touch the floor.
Part 4: Advanced Progressions & Technical Variations
Once you can perform 3 sets of 15 strict bodyweight reaching sit-ups with a 2-second hold at the top, use these variations to keep progressing:
1. Dumbbell/Kettlebell Weighted Reaching Sit-Up
- Setup: Hold a light dumbbell or kettlebell (5 to 25 lbs) vertically in both hands directly above your chest.
- Execution: Perform the standard reaching sit-up mechanics while pressing the dumbbell straight up toward the ceiling.
- Benefit: Adds direct external load to the rectus abdominis, stimulating deep muscular growth and building abdominal wall density.
2. Cross-Body Oblique Reaching Sit-Up
- Setup: Establish the standard starting position with arms extended overhead.
- Execution: As you reach upward, rotate your upper torso slightly to drive your right hand toward the upper left corner of the ceiling. Lower with control, then repeat on the opposite side (left hand to upper right corner).
- Benefit: Recruits the internal and external obliques alongside the upper rectus abdominis, carving out crisp side-core lines.
3. Stability Ball Reaching Sit-Up
- Setup: Lie back over a 55cm or 65cm stability ball so your lower back curves naturally over the top of the ball, with knees bent and feet planted wide.
- Execution: Extend your arms straight up. Lower your upper body back over the ball to achieve a deep pre-stretch on your abs at the bottom, then curl upward and reach straight for the ceiling.
- Benefit: Expands the movement’s arc beyond flat floor limits, training the rectus abdominis from a deeply stretched state to full peak contraction.
Part 5: The 7 Deadliest Mistakes in Reaching Sit-Ups
Avoid these technical errors to keep your core working hard and protect your joints:
1. Reaching Forward Instead of Upward
- The Error: Pushing your hands forward toward your knees or feet as you sit up, which changes the force vector from vertical to horizontal and lets your hip flexors pull you up.
- The Correction: Lock your eyes on a spot on the ceiling directly above your chest and reach straight up toward it.
2. Pulling and Jerking with the Neck
- The Error: Tucking your chin hard into your chest or snapping your head forward to initiate momentum at the start of each rep.
- The Correction: Maintain a neutral neck alignment. Imagine holding a tennis ball gently between your chin and collarbone throughout the movement.
3. Allowing the Feet to Lift Off the Floor
- The Error: Your feet or heels flying up off the floor as you initiate the sit-up, indicating that your hip flexors are yanking on your pelvis.
- The Correction: Drive your heels into the floor. If your feet still lift, lower the weight or practice flattening your lower back against the mat before curling up.
4. Flapping or Bending the Arms
- The Error: Allowing your elbows to bend or swinging your arms back and forth to create momentum during the concentric phase.
- The Correction: Lock your elbows completely. Your arms should act like rigid steel pillars that move only because your core is curling your upper torso off the floor.
5. Arching the Lower Back at the Bottom
- The Error: Letting your lower back arch off the floor when returning to the starting position.
- The Correction: Keep your core engaged at the bottom of every rep. Lightly press your lower back into the mat before starting your next rep.
6. Falling Back Down Rapidly
- The Error: Reaching the top position and crashing back down onto the floor without controlling the lowering phase.
- The Correction: Lower your upper body slowly over a 3-second count. The eccentric lowering phase drives significant core strength gains.
7. Holding Your Breath
- The Error: Performing reps while holding your breath, which spikes blood pressure and limits deep abdominal recruitment.
- The Correction: Exhale completely through pursed lips as you reach for the ceiling at the top, then inhale deep into your belly as you lower back down.
Part 6: Comprehensive Comparison Matrix
| Exercise Factor | Reaching Sit-Up | Traditional Sit-Up | Hanging Leg Raise | Ab Wheel Rollout |
| Primary Target | Upper/Middle Rectus Abdominis | Hip Flexors + Low Abs | Lower Rectus Abdominis | Full Core + Transverse Abs |
| Lumbar Shear Stress | Extremely Low | High (Psoas Pull) | Low (if form is strict) | Moderate to High |
| Lever Arm Length | Long (High Torque) | Short | Long | Maximum |
| Hip Flexor Demand | Minimal / Isolated | Extremely High | Moderate to High | Low to Moderate |
| Neck Strain Risk | Virtually Zero | High | Zero | Zero |
| Hypertrophy Rating | 9.5 / 10 | 5.5 / 10 | 9.0 / 10 | 9.5 / 10 |
Part 7: Science-Backed Workout Protocols
Because your core muscles contain a balanced mix of Type I (slow-twitch) endurance fibers and Type II (fast-twitch) power fibers, they respond best to a combination of controlled time-under-tension, progressive loading, and varying rep ranges.
Protocol A: The “Core Sculptor” Hypertrophy Routine
Perform this routine 2 to 3 times per week at the conclusion of your main resistance workouts.
- Weighted Reaching Sit-Ups (Dumbbell or Plate): 4 sets x 12–15 reps (Tempo: 3-1-1-2; Rest: 45s)
- Cross-Body Oblique Reaching Sit-Ups: 3 sets x 15 reps per side (Tempo: 2-0-1-1; Rest: 45s)
- Hanging Knee or Leg Raises: 3 sets x 10–12 reps (Rest: 45s)
- RKC Plank Holds: 3 sets x 45 seconds (Maximally squeezing abs, glutes, and quads; Rest: 45s)
Protocol B: The “No-Equipment” Home Core Circuit
Requires zero gear and can be done anywhere.
- Bodyweight Reaching Sit-Ups: 4 sets x 15–20 reps (Hold a 2-second squeeze at the top of every rep; Rest: 30s)
- Bicycle Crunches: 3 sets x 20 reps per side (Rest: 30s)
- Stability Ball or Floor Deadbugs: 3 sets x 12 reps per side (Rest: 30s)
- Side Plank Holds: 3 sets x 40 seconds per side (Rest: 30s)
Part 8: Spinal Safety, Pelvic Tilt & Postural Mechanics
Understanding how pelvic positioning impacts core activation can make or break your results with reaching sit-ups.
1. Mastering the Posterior Pelvic Tilt
Before performing a single rep of a reaching sit-up, you must establish a posterior pelvic tilt:
- Lie on your back with knees bent and feet flat.
- Imagine your pelvis is a bucket filled with water. Tilt the bucket backward so water would spill out toward your belly button.
- Contract your lower abs and glutes slightly to press your lower back firmly flat against the floor, eliminating any natural arch or gap beneath your spine.
- Maintain this flattened spinal position as you begin reaching upward.
2. Protecting the Cervical Spine
A major advantage of reaching sit-ups is that your hands are extended overhead rather than clasped behind your head. This eliminates the bad habit of pulling on your head and neck during difficult reps. Keep your eyes fixed on the ceiling overhead to keep your cervical spine aligned naturally with your thoracic spine.
Part 9: Frequently Asked Questions
Are reaching sit-ups safe for people with lower back pain?
When performed correctly—with a flattened lower back, zero foot anchoring, and controlled vertical movement—reaching sit-ups place significantly less compressive strain on the lumbar spine than traditional sit-ups. However, if you have an active lumbar disc herniation, consult a physical therapist before performing any spinal flexion movements.
Can reaching sit-ups help reveal a visible six-pack?
Reaching sit-ups build, thicken, and define the underlying rectus abdominis muscle tissue. However, revealing a visible six-pack requires lowering your overall body fat percentage (typically below 12% for men and below 20% for women) through a structured calorie deficit managed via proper nutrition and regular training.
How often should I train my core with reaching sit-ups?
Your abdominal muscles recover relatively fast, but they still require time to adapt and repair. Performing targeted reaching sit-up workouts 2 to 3 times per week as part of a well-rounded core routine provides optimal stimulus for growth and strength gains.
Where would you like to take your core training next?
Compare Reaching Sit-Ups vs Ab Wheel Rollouts
Get a complete Six-Pack Core Workout Routine
#ReachingSitups #CoreWorkout #AbsWorkout #SixPackAbs #FitnessGoals #GymMotivation #Bodybuilding #StrengthTraining #Calisthenics #AbDay #ExerciseForm #PersonalTrainer #FitTips #HomeWorkout #CoreStrength #FitnessJourney #WorkoutRoutine #WeightLifting #FitLife #UpperAbs #CoreTraining #PhysicalFitness #SportScience #FunctionalTraining #GymLife #TrainingTips #AbExercises #CoreStability #WorkoutMotivation #MuscleBuilding
